Come join me in my journey through the love of cooking, through difficult Creme Brulé's and easy peesy salads. Sharing my passion for cooking, great food...Let's bring the yummyness home.


Thursday, February 16, 2012

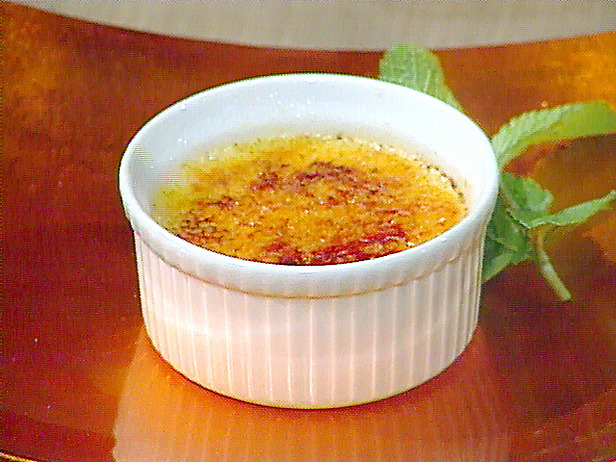
Heavenly Creme Brulee

Have you ever eaten something so delictable, so amazing that you had to have more..well some time ago we went out for a dinner & a show, for dessert I ordered the Creme Brule...and my world has been changed from then on...

My mission life now is to make the perfect Creme Brulee...and of course now to share it with you.  I'm still struggling a bit with the topping to get it perfectly smooth, i have tried a couple of different ways but it is just not coming out the way I want it to, but we will keep trying.


I have also tried a couple of different recipes, since the one recipe comes out very soft, but the taste is awesome, and the other recipe comes out to eggy...again trial and error...

Here is some pics of the process for those of you that want to see a work in progress, I must also admit, Creme Brulee is not as difficult as everyone says it is:

I don't have any ramekins so i used some white cups, they worked perfectly to, and also your guests can hold the dessert with the handle:

Fill a large roasting tin (the ones that usually come with your oven) halfway with boiling water. Place the ramekins into the roasting tin


Mix the egg, yolks and half the sugar together in a bowl.

Place the cream, milk, vanilla pod and the remaining sugar into a saucepan and bring to the boil. (If you like the black seeds in the creme brulee, split the vanilla pod down its lenth first) if you don't have a vanilla pod then use vanilla esscense.

Strain the boiling mixture into the egg mixture and whisk well.


Fill the rammikins and cook for 45 minutes.


Remove them from the oven and allow to cool, thenplace in the fridge.

Just before you serve the, sprinkle the tops with sugar and caremalise with a blowtorch. if you don’t have a blowtorch, put the oven on grill and plave them under the grill until caremalised. (Its very quick so watch them)


Serve immediately with a few strawberries or other fruit and dust with some castor sugar.


Let the flavour take you away....
Here is the recipe:

Crème brulee
What you need
375ml cream(1 tub)
125ml milk
75ml sugar
4 egg yolks
1 whole egg
1 vanilla pod
4 ramekins

The process

Heat the oven to 120 Celsius (very important to get this right)
Mix the egg, yolks and half the sugar together in a bowl.
Place the cream, milk, vanilla pod and the remaining sugar into a saucepan and bring to the boil. (If you like the black seeds in the crème brulee, split the vanilla pod down its length first)
Strain the boiling mixture into the egg mixture and whisk well.
Fill the ramekins and place them in a roasting pan with enough water to reach half way up the sides of the ramekins and cook for 45 minutes.
Remove them from the oven and allow to cool, then place in the fridge.
Just before you serve the, sprinkle the tops with sugar and caramelize with a blowtorch. if you don’t have a blowtorch, put the oven on grill and place them under the grill until caramelized. (Its very quick so watch them)
Serve immediately with a few strawberries or other fruit and dust with some castor sugar


Thursday, January 12, 2012

Home made Pizza

There is truly almost nothing better than Pizza, we have a tradition in our home that we make pizza every Friday night....It such an easy meal to make and everyone can take part, putting on their favourite toppings.

I have a bread maker that makes the dough for me, but sometime I'll go to the supermarket and buy some dough at the bakery, otherwise I'll make it myself. 

I found this on the Internet, very interesting the history of pizza:

In 16th century Naples a Galette flat bread was referred to as a pizza.  A dish of the poor people, it was sold in the street and was not considered a kitchen recipe for a long time.  Before the 17th century, the pizza was covered with red sauce.  This was later replaced by oil, tomatoes (after Europeans came into contact with the Americas) or fish. In 1843, Alexandre Dumas, père described the diversity of pizza toppings.  In June 1889, to honor the Queen consort of Italy, Margherita of Savoy, the Neapolitan chef Raffaele Esposito created the "Pizza Margherita," a pizza garnished with tomatoes, mozzarella cheese, and basil, to represent the colors of the Italian flag. He was the first to add cheese. 

How interesting, my dream is to go to Italy some day and eat real Italian pizza and pasta...love the culture, I must have been an Italian in one of my previous lives.

So here we go:


Make your own Pizza Dough

1 tablespoon active dry yeast,
1 1/2 cups (350 cc) warm water
3 1/2 cups (500 g) flour
1 tablespoon extra-virgin olive oil
pinch of salt

In a small bowl, sprinkle the yeast on the warm water and stir to dissolve it. Set aside until the yeast starts forming bubbles in about 5 minutes.  Sift the flour. Pour the flour into a large bowl or on a work surface. Mold the flour in a mound shape with a hole in the center.  Pour the yeast mix in the center & then the olive oil and a pinch of salt. Using a spatula, draw the ingredients together. Then mix with your hands to form a dough.  Sprinkle some flour on the work surface. Place the dough on the floured surface. Knead the dough briefly with your hands pushing and folding. Knead just long enough for the dough to take in a little more flour, and until it no longer sticks to your hands.

Ingredients for the Pizza (Toppings)

Tomato Paste (The thickness of the tomato paste all depends on you)
Cheese
The rest is up to you.

1.  Then to start on the Pizza itself, place the dough in/on your baking tin, I used a deep dish.  Now "knead" the dough in the dish so that it spreads everywhere, this might take some doing, but take a sip of wine and then go on... 
When you have the dough in all the corners and it's spread nice and evenly, then add your tomato paste, spread it nice and evenly.


2.  Then you can start adding your toppings, I have used cheese grillers here:


3.  A bit of bacon, or if that is not for you then any other meat topping or what ever you prefer:


4.  I then topped it with cheese and then a bit of herbs sprinkled over it and then into the oven it went, 180 C for about 20 minutes, this heat is just enough for the cheese to melt gradually and the dough to cook.  And then when it's ready take it out, let it cool a bit and cut it up.


And now for a movie and yummy pizza

Thursday, November 3, 2011

Bobotie (Curry Meat Dish)

Bobotie is a very popular South African home cooked dish, it is once again easy and the taste is ooh laa laa..  I used to think that some dishes was so difficult I would never be able to make them, but as i have gotten older i have learned that everything is easy if you have successfully done once, if you have step by step notes or pictures.


This is a simplistic but yet very flavour full recipe:


So what we need:


500g to 1kg mince (it's up to you)
1/2 onions chopped
1 slice bread
250ml milk
2 eggs
1 tbl mild curry powder
2 tbl tumeric (this is for the nice yellow colour)
3 tbl fruit chutney
1 tbl sugar
salt & pepper for taste
I don't like raisins in but most people add about 125ml of seedless raisins - up to you.
3 bay leaves


What do we do:


1.  Drizzle a little oil in a pan and then add your chopped onions, saute them until they are a nice golden brown.


2. Soak the piece of bread with just a little bit of milk, leave that for now to soak.


3.  When your onions are ready add your mince, and then let them summer so that they can become nice and brown.  Don't add any spices yet.


4.  Now go ahead and add all the spices,1 tbl mild curry powder, the 2 tbl tumeric (this is for the nice yellow colour), the 3 tbl fruit chutney, the 1 tbl sugar, salt & pepper for taste.  You can also add your slice of bread, by breaking it into little pieces, then keep stirring and let it simmer for a little.

5.  Now pour or dish your mince mixture into a glass oven proof container, and let it cook at 180C for about 20 minutes...Always keep an eye to make sure that it doesn't burn. 

Now while the mince is in the oven prepare your egg mixture for pouring over.  Mix the two eggs & milk together. 

After about 20 minutes take out the mince and pour the egg mixture over it and place it back into the oven, now you can place some bayleaves on the egg mixture and then put it back into the oven. 


And then after about another 15 minutes or so, the Bobotie is ready.  Doesn't that just look yummy...

Dish up with some rice and veg....wholesome cooked meal.


Wednesday, November 2, 2011

Macaroni & Cheese

I love pasta, I truly do, I could most probably eat it every night for dinner...There are so many ways to cook it.  So here is another nice & easy recipe, very quick to make and once you pop it into the oven you can sit back and relax.  My family loves this one, and what's nice about it is if you don't have certain ingredients then you can leave them out. 

Food is all about flavour and enjoyment, making food always puts me in a good mood, and i try not to cook if i don't feel like it...Food should be a pleasure...so enjoy it.

So what do you need:


Macaroni
(I used a bit of a bigger macaroni, but also if you don't have use and other pasta except for spaghetti.)
Onion (chopped)
Oil
3 Eggs
500ml milk
250ml cheese (but if you don't have that much throw in what you have, the more cheese the yummier)
5ml mustard powder
Salt
herbs
1/ 2 Tomatoes

Extras:
Bacon or Ham


1.  Firstly you start by chopping up your onion and then drizzle your pan with some oil, now saute (meaning to cook food in a little bit of oil) onion until golden brown.


2.  Cook your pasta in boiling water, add some oil, this is so that the pasta doesn't stick together.


3.  While the pasta is cooking away, then we can continue with the onion, now add some bacon or ham bits, and cook until nice and brown. I don't really add any flavouring here, but salt and pepper is always nice.


4.  Now let's start on the sauce....Mix you eggs, milk, mustard powder, cheese and spice together.  Mix it very well.  In the picture below you will notice i used two eggs, that is because my eggs actually counts as four eggs, they have two egg yolks in.  You might need some more sauce, it all depends on how much you are cooking, so just keep adding 1 egg and 250ml milk for every time you increase.


5. When your pasta is ready strain the water away.  Now take your glass counter (oven proof) and now only fill it halve way as to make a layer of pasta. 


6.  Now add your bacon, I sometimes mix the bacon and the pasta together, so that there is a nice consistency of pasta and meat.  I also sometime mix in more cheese, I love cheese.  But in this case i made a layer pasta and then a layer bacon, then make a layer tomato slices and sprinkle some cheese.


7.  Now cover it with the rest of the pasta, and then place a couple of tomato slices on top, now pour over your sauce, yes your container might be to small as you can see mine was, but try to get in all the sauce.  Then you can put it into the oven at 180C for about 30 to 40 minutes, keep looking into it every 15 minutes, until all the egg mixture as become solid.


When it's ready take it out and you can serve it with a green salad or some spicy beetroot...this can be a very filling meal but also nice and light for the summer.

Enjoy

Tuesday, November 1, 2011

Potato Salad

I personally love potato salad and you can have it with any kind of meat, it is a great complimentary salad.  There are a lot of methods in making potato salad, adding onions, or egg etc etc....

My recipe is plain and simply, it comes out creamy and soft and oh so yummy.  I always used to cook my potatoes on the stove but then someone showed me the method below and they blew me off my feet, and now are rarely do it any other way...so try it you might save a lot of time preparing your potatoes, time you can use enjoy the food....

So what do we need:


8 large potatoes
50ml Condense Milk
250 ml + Mayonnaise
Sugar - 50 ml about.
salt
spring onion - chopped

Optional
1/2 eggs (cooked)
1 onion (chopped)


What do you do:


1.  So first you place all your potatoes into a plastic bag, normal shopping bag.  Then you make two or three inserts into the potatoes.  Then you close the bag and put it into the microwave.  You put the potatoes in for the same amount of potatoes in the bag plus 1. 

Just always test the potatoes, if they are not ready yet put them in for another 3 minutes at a time...


The other method of course it to boil your potatoes on the stove in water in a pot, or still in the microwave, but after you have taken off the skin and cut them into the cubes you want, either ways it is up to you...what every work easier..


2.  While your potatoes are becoming edible..hehehe, it's time to prepare the sauce.  When i got married my husband & I had numerous arguments about what comes in the sauce we came to a collaboration, thus the recipe. 

Add your mayonnaise, sugar, condensed milk all together and mix well, i love tasting and the most important rule about food it tasting...so now you can add a little milk at a time, if it's to runny, just add more mayonnaise. There is no precise way in making potato salad, it should taste good that's what count.  I like adding some salt and some herbs, just for a little extra.


3.  At this stage your potatoes should be done, if they are not, place your sauce in the fridge to keep it nice and cool.  After the potatoes have cooled down, and they are peeled and cut into little blocks, then you can add you sauce over...

A lot of people add chopped up onions & boiled egg, that is all up to you, i don't eat onion and my husband doesn't like egg in, so again we compromised and it works perfectly.  Now pour over you sauce, slowly mix it into the potatoes...just remember YOU ARE NOT MAKING MASH...so there is no need to stir, "fold in" the sauce slowly....

And then you are done, potato salad is best served cold so place it into the fridge to cool down...Serve with some grilled chicken & a nice green salad and you are all set..

Enjoy